Posted on

High profit – low Drawdown: Riding Trends with AutoTrendTrader

With my new Strategy, the AutoTrendTrader, you’ll receive a powerful Tool to identify strong Trends.

If you take some time to optimize the Settings, you have the Opportunity to find a Setup that is really mindblowing.

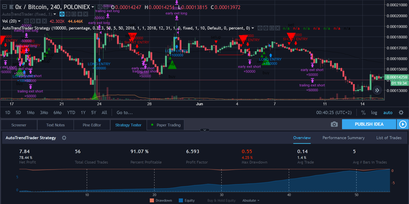
I found such a highly profitable Setup for ZRXBTC on the 4H Timeframe. You’ll get only a few Signals per Month, but according to the Backtests, more than 90% of the Trades are profitable.

Sounds almost too good to be true? But it’s getting better: Depending on your Account-size and the Position-sizes you are using, you’ll achieve almost 80% Net Profit with less than 5% Drawdown!

I’ve been using the AutoTrendTrader on the 5 Minute Chart with Autoview to automate my Trades – and this works pretty good. I wanted those instant Gratifications and the Kick you’ll get when you’re Trading on shorter Timeframes.  But Riding strong Trends can be more profitable and less risky – but it takes Time and Patience.

Maybe you’ll give it a Try?

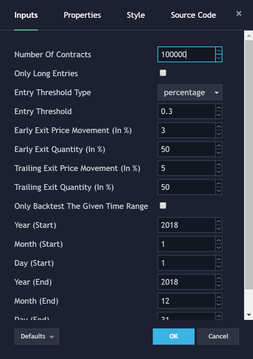
See below the Settings I’ve been using for this profitable Setup.

Posted on

Five Steps to build a Crypto Trading Bot

Due to their high volatility, Cryptocurrencies are a perfect fit for algorithmic, automated – or as some might call it – robotic trading.There are different types of Crypto Trading Bots available, free and commercial ones. Using TradingView as a platform to develop, backtest and execute strategies that generate buy-/ sell signals has some major benefits – and this article should get you an Overview on the Architecture:

  • TradingView can be used free, although paid plans do have some useful benefits/ features
  • TradingView is web-based – Strategies can be developed and backtested in a Browser
  • You can use lot’s of free strategies or buy/ subscribe to commercial ones
  • You can implement your own strategies by using PineScript – there are lots of Documentations and Examples out there

There’s one thing that’s still not possible with TradingView and that’s executing trades based on your own scripts. But there is a workaround – it is a Chrome-Extension called Autoview. Autoview is an interface to some Crypto-Exchanges and a Forex-Broker. This is the List of Exchanges/ Brokers that are currently supported: 1Broker, Binance, BitMEX, Bittrex, OKCoin and Poloniex.Trade-Execution will be triggered by TradingView alerts.It would be a good Idea to install Google-Chrome on a VPS (Virtual Private Server), install the Autoview Extension and login into your TradingView account, but of course you can start playing around with Autoview on your Laptop.To get your feet wet with algorithmic/ automated Trading, go ahead and do the following Steps:

  1. Subscribe to TradingView by following this link. There is one pitfall with the free plan: you can only create one Alert while the most Strategies need at least two Alerts – one for Entry-Signals and one for the Exits. In a later Blog-Post I will describe a fully automated approach that needs only one Alert but for now you should use an advanced TradingView plan with a free Trial.
  2. Create a free Account at the Bitmex-Testnet – as far as I know Bitmex is the only Exchange that is supported by Autoview that supports Paper-Trading. Go to the Account-Settings, Submenu “API Keys”, create an API Key and save the Key somewhere so you can copy-paste it to your Autoview-Settings later. The most popular Symbol traded on Bitmex is XBTUSD which is a perpetual contract based on Bitcoin/ BTC. You can trade long or short and trade on Margin/ use Leverage. Other Symbols like Ethereum (ETH), Cardano (ADA), Bitcoin Cash (BCH), Litecoin (LTC) and Ripple (XRP) are available too. If you intend to create a Live-Trading Account at Bitmex, you would do me a favor when you use this affiliate link.
  3. Assuming that you are already using Google Chrome (if not, get the Browser here), install the Autoview Extension, configure the Extension to use your Bitmex-Testnet Account by pasting the API Key, and make yourself familiar with the Alert-Syntax. You will use the Alert-Syntax to create Commands that will be executed each time an Alert is triggered.
  4. Do the hard Work: Pick a Strategy that has a Study-counterpart that both were made to be used with Autoview. You can go to the TradingView search-bar, chose to search for scripts and search for the keyword “autoview”. Or you can read the Autoview Documentation – there are a lot of tutorials and links to free Strategies/ Studies. Of course you could just subscribe to one of my Products – all of them are ready to be used with autoview, but starting with a free one by using the Bitmex-Textnet is a reasonable way to start your path to algorithmic Trading.
  5. Finally, if you picked a Study – create your Alerts as described in the Autoview Documentation to see if your configuration works and Trades go through the System. Maybe you start Trading on lower Timeframes to generate a lot of Signals. If Everything works and you understood what’s going on, it’s Time to optimize your Settings.

I will go into more Details later but this is a kind-of Quickstart Guide that gave you an Overview on how things are connected.If you have Questions, feel free to contact me via Email, Skype (stefan.krecher), TradingView-private Message (Trader stefcom) or fill out the Form on my Contact Page.